
There will be two Mail Man puppets used for filming so I will be working on both armatures simultaneously to make sure the two puppets are padded identically. You can find out more about the construction of these armature on my brothers blog HERE.
Now for the hard part....or parts.
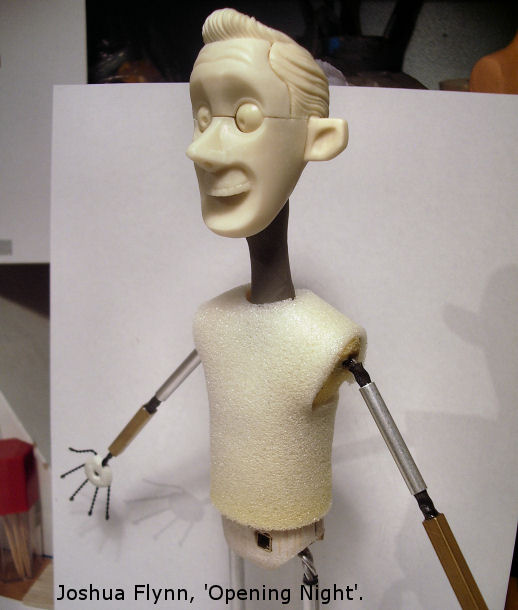
Harder sections are needed on a puppet in order to properly grip the puppet. These section don't need to be squashed in any way when the puppet is moved and are usually found around the chest and hip area.
To begin I created triangular shape out of balsa wood to bulk out my characters hips. I then cut the triangle in half and traced the metal armatures shape onto the inner sides. These shapes where then carved out using a rotary tool in order for the armature to slot inside.

Square holes where cut to allow access to the rigging points. The balsa wood was then glued onto the armature using a two part epoxy glue and sanded smooth. Balsa wood is ideal for these parts because it is strong, light wieght and easy to work with. In the past I have also used blue foam core to make these parts which is easier to cut than balsa, but can also crush slightly of squeezed too hard.
The chest secton was made using the same techniques as described above. It is important to remember that your puppet still needs to be able to come apart so don't glue the balsa to any removable arm, leg or neck parts and don't cover up any rigging points. Also, a large area needs to be left above and underneeth the arms to allow for shoulder movement.
Now for the soft parts.
Areas that need to squash or stretch with the movment of the puppet need to be made of softer materials. Below are a selection of materials I've used to pad out my puppet including a selection of sponge/ foam, sharp scissors and contact adhesive.

Below I've added thicker upholstery foam to the waist and shoulder areas. I tend to cut the foam roughly to the shape I need and then glue it to the armature using the contact adhesive. Once dry, I then trim the foam further, cuting until I'm happy with the shape.

Contact adhesive is ideal because it's fast drying and can flex with the foam once dry. Remember to let the contact ashesive dry fully on both pieces before pushing them together, and make sure everything is alligned because it sticks instantly.


Neat work. I've never heard the term 'boil' before. Great metaphor.
ReplyDeleteDid you not cut out an area for the hip(rig) in foam?
ReplyDeleteYes, I cut slits into the foam on the back and side of the puppet for the hip rigging points. I must have forgotten to mention that sorry.
DeleteGreat detailed information, I ll be visiting you more frequently, here is very interesting information.
ReplyDeleteLong board & Balsa Long board
Where do you get these foams? One is upholstry foam. And how do you call the blue? Can you use them to bulk out a puppet before casting in silicone? And will the puppet still be flexibele after that?
ReplyDeleteHi Lien,
DeleteI bought all of these foams in local fabric shops. They're all used for upholstery.
Yes, you can use it to bulk out a puppet then cast a silicone skin around it. That would help thicker parts of your puppet to be more flexible compared to casting a solid block of silicone. You'll want to make sure the foam doesn't break through the surface of your silicone skin though. When laying your foam bulked out armature into your mould make sure the foam doesn't touch the surface. As a rough guide You'll want at least a 3mm gap between the foam and your mould to give you a 3mm silicone skin. You may want it thicker or thinner in places depending on how you want your puppet to flex.
Hope this helps!
Thanks. Your blogs are a great help since Im only starting with my first puppet and stopmotion. Im from Belgium so that explanes why I did not know the word upholstry. I Thought the silicone would be sucked up by the foam and then become less flexible so I decided to make a smal puppet instead of a big sized one to save on silicone.
DeleteHey guys! Great work! I was wondering what size K&S you used as well as the round aluminum for the upper and lower body? It looks like you have a mix between double twisted 1/8th wire for the lower body and double twisted 1/16th for the upper body. Is this correct?
ReplyDeleteThanks Kevin!
DeleteI'm afraid I'm struggling to remember the exact sizes we used back then.
You're right about the different thicknesses of ali wire for the arms and legs.
I think we used 4.76mm aluminium tubing and the K&S sises were 5.55mm and 4.76mm???
Different brands of square brass tubing have slightly different measurements, but as long as it fits your ali wire heat shrink tubing you should be ok. Might be best to order a selection of sizes if you can't see it in store, good to built up a stock.
Hope this helps!
oracle rac training
ReplyDeletemsbi training