Friday 9 December 2011

'Opening Night' Showreel

Don't you just hate it when a blog doesn't update for months.
Apologies. But I'll make it up to you with a video.

For some reason I thought I had already posted this video, but apparently I haven't. So, better late than never, here is a showreel for our film 'Opening Night'.

This video is basically a summary of the work we had completed near the end of our third year at Uni. It features our sculptures, concept art and puppet building, along with some animated shots from the film. Obviously none of the shots are finished, a lot are simply tests, but it should give a good idea of how things are shaping up.

So turn up your volume and snap your fingers along to 'The Chordettes'.
Without further ado, here's the video, hope you enjoy-


I've also got a few test images of the puppets on set, to try and get a better idea of how things will look on screen.


Twitter

You can now follow the progress of both Nathan and myself on Twitter!
Yes that's right, We have boldly stepped into the future to join the boundless realms of the Twitterverse.

We'll be posting on the progress of our film as well as the various sculpting projects we undertake as part of our Sculpt-Double website.
So if like us, you too are floating, weightlessly through the never ending wonders of the twitterverse,
why not follow us @SculptDouble -

I'm going to be working on a few sculptures over the next few weeks, But progress on the film will continue in the new year.

Happy Holidays everyone!

Tuesday 23 August 2011

Sets- Theatre Front

In this post I will be talking about some of the sets my brother and I have created and how we went about shooting certain shots for our film.
My brother Nathan has already started posting about the construction of the alley way set which features at the beginning of our film. You can find that HERE.

I thought It would be best to start at the begging and to show the first shot we set up for the film. To ease ourselves back into the swing of things we decided to tackle one of the more simple shots.

Pictured above is an image of the shot in question as it appears in our storyboards. The shot features the Mail man character looking up towards the camera with a look of shock/worry on his face. He then quickly raises his arm to look at his watch. In the film the character is actually standing outside, in front of the theatre, looking up at a billboard featuring Elle (our Actress character). However no theatre set was need for this shot since that would all be behind the camera, and we didn't need to make much because the character is being shot from above and taking up most of the screen. All we needed was a small section of pavement, some tarmac road and a street light.

Pictured above is the set as required for the shot. Not the most spectacular example for a post about sets but they will get better I promise. This set was very simple to put together. The puppet is standing on an MDF stage which is resting on sturdy tabletop a little higher than waist height. The MDF stage allows me to drill holes along the surface of the set in order to tie down the puppet. Openings along the side of the stage are used to reach underneath the set to use the tie downs. (More on tie downs later)

The set is lit using two halogen lights attached to a simple scaffolding lighting rig. The character is being lit heavily from the front to simulate the bright theatre front lighting around the bill board he is staring at. The camera is a Canon 500D attached to a secure tripod angled down towards the character so that the character is looking up towards the camera lens.

 For this film we are shooing with Stop Motion Pro V7. The computer is on a separate station slightly away from the set with the monitor angled away to stop any unwanted light from affecting the shot. In the picture below you can see an image of how the framed shot looks on the monitor using the full resolution viewer of Stop motion pro. To save time and materials, we try to only build things the camera sees. This means a lot of cheating. For example, the street light cuts off half way with no actual light attachment. You never actually see the top on the light so instead we suggested a street light using some plastic piping and a bottle top painted matt green. The sidewalk and road were made with MDF and card simply sprayed with a grey primer followed by some stone effect 'speckle' spray paint for a concrete texture. 

Later in the shot, our character checks the time on his watch. We didn't actually make a small scale watch for our character, the shot cuts away to a close up before his watch would be revealed from under his sleeve. The character simply raises his wrist.


We then cut to a close up of the characters watch on his wrist. For this we made a large scale arm and watch which was close to being life size. The arm was made from a length of card tubing, covered in a thin sheet of flesh coloured plasticine. we used some spare material from the puppets cloths for the sleeve, which could be pulled back to reveal the watch. The whole arm was supported by a few twists of thick aluminium wire so we could give some movement to the arm. The watch was made from a jam lid, for the main body, and some spare leather material for the strap. We could have used an actual watch for this shot, but we felt that it would have stood out from the style of the film and looked too realistic. So instead we used my deluxe jam time piece.


We filmed this shot on the same set up so that the lighting would match with the previous shot. For this shot the sidewalk floor is out of focus with no visible shadow cast from the arm so it looks like it is further away from the ground than we actually shot it. The second hand of the clock could also be animated for that all important ticking

The next shot we decided to film allowed me to try out more of the puppets movements. This set was also very easy to make which might be a surprise considering what the storyboard panel looks like.

We knew we couldn't build the whole theatre and that we were going to use green screen to extend the building. For a while we tried to decide how much of the building we were going to make, maybe cutting off just above the characters head, or if we could build a miniature theatre. In the end we decided it would be too difficult and take up too much time to build the theatre (especially with the amount of lights we wanted on the building) so we filmed this shot on a green screen with the idea of adding the theatre later on.

So the character was animated staring up at a big green nothing. The camera was positioned below the edge of the stage, angled upwards. The character was mostly lit from his front so that he appeared almost in silhouette. To make sure the character is looking in the right direction I painted a rough digital mock up of the theatre as we wanted it to appear in shot. This could then be superimposed on the green screen to appear on the live view of the stop motion pro programme. This is just to give you an idea of positioning while filming and won't appear when exporting your finished shots.
This shot began with the character running in from the left of the screen and stopping in the centre. It was the first time I had animated the character running or doing any big movements. To support the character I used  a rig made from brass K&S tubing with an adjustable screw tread system made from a large bolt. This allowed the character to be raised up and down in tiny increments. The rig rested on the table, was held down by weights, and could be slid across the surface. Any parts of the rig that appeared on camera were covered with green card. You can see the rig supporting the character in the picture below.

The rig was used when the characters feet left the floor, but when back on the ground, his feet were secured with tiedowns. The tie down hole on the bottom of his foot can be seen in the picture above. For this character we used an M3 bolt, wing nut and a nut (inside each foot).

Pictured above is an example of the tie downs we are using. One wing nut has been soldered to the bolt (you can also use a length of threaded bar for longer tie downs) and another remains separate and is used to tighten the character to the stage once the bolt is attached to the nut in the puppets foot. The wing nuts make it easier to twist the tie down when reaching under the stage. I much prefer the tie down method of securing a puppet to a surface as opposed to magnets, which aren't as strong and can sometimes still allow the puppet to twist or slide.
Once this shot was completed, I started working on an image of the theatre to use on the green screen. Using the rough mock up image as a guide I started blocking out the building with colours and added in a few more details. The size of this image was made taller than the usual wide screen aspect ratio to allow us to include a camera move in this shot, moving up to reveal more of the building. The lower part of the building was made using photographs of the theatre ushers set that was built. There are still changes to be made and  a lot more details to add to this shot such as lights and textures. The billboard posters are also temporary. However, This does help us get an idea of how the shot will look once completed and is hopefully a bit better than the plain green screen we filmed against.

That's all for now. More to come soon.
Thanks for looking.

Monday 8 August 2011

Theatre Usher Puppet

Great Scott! has it really been that long!
Apologies for not posting anything in such a long time. A lot of things have happened over the last few months. My brother and I have both graduated from university, gone on vacation with the family and interned on a big stop motion film currently in production in London. It was an amazing experience and  now that I'm back I feel inspired to continue working on our own film and put into practice all the things I have learnt. So, It's time to zap some life back into this blog, commence re-animation and bring it back from the dead!
With the help of Nathan (my hunch backed assistant) we will assemble the parts we have already collected and continue work on the project.
...It's Aliiiiive!

Theatre Usher Head Sculpt
As promised (a long time ago), In this post I'm going to be talking about the development of the theatre Usher, taking over from where Nathan left off. The body and cloths are mostly completed, I'm going to be working on the head sculpt and a few finishing details. You can see Nathan's work of the Usher puppet HERE.

For the theatre Usher puppet, my brother and I decided not to use the same solid replacement face method we used on the Actress and Mail man characters.This is because it would take too long to cast out all the different face pieces for a secondary character with such a small part in the film. To save time we decided to create the Usher's face using Plasticine. Plasticine is great for puppets because it's cheap, easy to use and comes in a wide variety of colours that can even be mixed together. The plan is to re-sculpt the Usher's face for each frame to change his expression. This should work well since the character's face needs to be squashed flat for a gag in the film where he is hit in the face by a door.

To keep the weight of the head down I decided to sculpt the back half of the skull using Sculpey Ultra light clay. This was then covered with a thin layer of grey Super Sculpey to finish off the form and add small details.
Eye sockets were also added using spare fast cast eyeballs covered in Vaseline. The sculpt was baked with the eyeballs in place to accurately capture the shape of the eyeball for the socket. The eyes were then easily removed (thanks to the Vaseline) from the sculpt. Baking fast cast causes it to go from white to a amber/yellow colour, so it's a good idea to use spare eyeballs, not the nice pair you've spend hours painting pupils on.

The next step was to paint the head. I used acrylics for this, mixing the flesh colour to match the plasticine I will be using the sculpt the face the best I could. The black band of the ushers hat strap should disguise the seam between the plasticine face and the solid Sculpey back. The eyes sockets were masked to stop any paint interfering with the way the eyes roll in the socket.

Above is a picture of some of the finishing details added to the Usher including buttons shoulder pads to create a more blocky,square body shape, a bow tie and small Usher hat. All of these details were attached using contact adhesive.


To reduce 'boiling' on the Usher's coat, I attached a sheet of thin foam to the inside of the jacket to stiffen it up yet remain flexible.

In the picture below you can see how the head attaches to the body using K&S square brass tubing. The collar and buttons have also been added.


In the following picture you can see the beginnings of the plasticine face. The Sculpey eye sockets and rectangular pegs help the plasticine attach to the solid back section of the head. The face is sculpted around the eyes and the face is broken down into sections depending on what parts need to be removable. Although the face can be sculpted into any expression, sometimes it is easier and quicker to sculpt a selection of mouth shapes that can be swapped out and smoothed onto the face.


Below is the finished head sculpt with the mouth piece missing.
For the first shot featuring the Usher puppet, I sculpted three different mouth shapes to be swapped out at different stages of the shot. Each mouth was re sculpted each frame to help them transition into each other.The picture below shows how the mouths slot on.

The seam line is smoothed each time the mouth is replaced. One draw back when using plasticine is keeping it clean. When not in use, wrapping any plasticine parts in cling film (Saran wrap) will keep away any dirt. Dust and fluff will travel from miles around to visit your nice clean sculpt, they absolutly love sticking to plasticine. It is also important to keep the plasticine clean while working on the puppet. Wet wipes or baby wipes are a good way of keeping your hands clean while working.

Finished Puppet
I didn't have time to take any picture of the Usher after he was finished so here are a few pictures of the puppet on set.
The green screen in the background will be used to extend the set digitally.
a small prop cigar was also sculpted from Sculpey with a pin to keep it in his mouth.
Here the expression has been changed. The Usher's nose is different on this puppet from the referance above. during the film the Usher is hit in the face with a door. This flatterns his nose, a look he is stuck with for the rest of the film. So for this first scene the ushers nose start's out normal... but by the end...
...It is squashed flat. Along with his cigar. The character was designed with his flat nose becase that is how he appears for the majority of the film.

Thats all for now. I'll have more updates soon including more info about the sets and filming.
Thanks for looking.

Saturday 11 June 2011

Mail Man 'Roy' Puppet Finished

Hello,
Things have been busy, but all is going well.
Today I though I'd post a few pictures of my finished Mail Man puppet, something I should have done a while ago but for some reason...didn't.

The puppets of the two main characters of our film are now finished and my brother and I are very happy with the way they have turned out. If you'd like to see Nathan's finished puppet for our actress 'Elle' character you can click Here.

Final Main Man Puppet
This character has been a lot of fun to build and has allowed me to try out new techniques I hadn't previously attempted. It has also been interesting building two of the same puppet simultaniously and trying to get each puppet as identical as possible.

Below are some turn around images of one of the final puppets.


For these photos I decided to position the puppet in the same pose as the Maquette I sculpted of the character a while ago.

For the following photographs I decided to try out the puppet's replacement faces to give him some different expressions,and also position the body into a veriety of poses. Once photographed I had a go at digitally removing some of the seams from the face sections using photoshop. This is what my brother and I intend to do for any shots in the final film where the seams are noticable.

And finally, Here is an 'Ultimate Image' of the puppet I made using the photos I have taken. This was made as part of the business section of the University course. It is intended to help promote the University aswell as myself and my work.  

That's all for now, It's been mostly pictures today.
Next time I'll be talking about finishing off the Theatre Usher character which Nathan has been working on.
Thanks for looking.

Saturday 21 May 2011

Props- Mailman's Bag & Hat

It's been far too long since I last posted anything. Things have been getting busy now that my brother and I are filming. I'm going to try to catch up and post more often so that I can show you how the shots are turning out soon, But first I'm going to continue talking about the model making process and today It's all about two of the mail man's props- his leather satchel and his hat.

Mailman's Bag
The Mail Man's leather satchel is quite an important prop for the character and plays an interesting part in our film. It also needed to be animatable and easy to control because I wanted the bag to swing and flow behind the Mailman when he is running, adding some nice secondary motion to the character's movements. In order to achieve this, the bag needed to be very light weight.

To start, I carved the main body of the bag out of balsa wood. This was ideal since balsa wood is light weight, strong and easy to work with. I chose to use this material as opposed to blue foam core because the bag would later need to be glued and contact adhesive and two part epoxys tend to cause the foam core to melt.

The balso was then carved and sanded into shape, using my sculpted maquette as referance. I also added some small K&S brass tubing to the back, glued in place with two part epoxy. This is where I'll later rig the bag to be animatable. I made both bags (one for each of the two Mailman puppets) at the same time to keep them identical.

Next, I used a rotart tool to carve down into the top surface of the balsa, creating a lip around the edge, giving the bag some depth. This was then painted black using acrylics. It wasn't nesisary to make the bag completly hollow, this was just in case the camera ever peeks under the edges of the bag flap, and to create the illusion of depth.

The next stage was to cover the basla with a fake leather-like material. Originally I planned to sculpt the main body of the bag from Sculpey, but later decided against it to keep the weight down and achieve a more realistic texture with a leathery material. The shapes for the bags panels were first roughed out in paper to create templates and then cut out from the leather material. These were then glued in place using contact adhesive.
The two side panels were glued on first, followed by one large panel (pictured above) which was streched virtically around the balsa creating the front, bottom and back of the bag. Any rough edges where folded back on themselves before glueing.

 The bag's opening flap was created seperatly and attatched afterwards. It included thin wire sandwiched between the leather and some brown card, allowing it to be controlled and repositiond when animating.

The bag strap was created in a similar way in order to allow it to be animated. One strand of thin copper wire was added to a small leather-like strap and covered with a thin strip of brown card. This stiffened the strap and allowed it to be controlled and repositionable. This copper wire is easy to bend, holds it's shape and should last longer than aluminium wire which tends to break after too much use.

To finish things off I added some straps to the opening flap and punched some buckle holes into them.
Here is one of the finished bags.
The shape of the bag was created to look distorted as if it was full, heavy and sagging in the middle as it appeares on my maquette. I'm pleased with the way the leather-like material turned out and I think it looks far more convincing than if I had simply sculpted it.
This is how it looks on the puppet. The bag is also curved to fit around his leg.

 For some reason I didn't include buckles on the bag of my sculped maquette and I was toying with the idea of adding them to these bags, but they just didn't look right and made things look cluttered and busy. So I decide to keep them simple and as they are. If anyone asks...I'll say that the bag is left open for easy access and that the buckle straps are tucked inside. What...you don't believe me?

Here is a shot of the two bags on the puppets.
To give more control to the movment of the bag when animating, I decided to add a rig going from the Mailman's waist to the back of the bag. This was made using two strands of the copper wire twisted together and attatched with two part epoxy to K&S brass tubing.

A flap was cut into the leather to give access to the K&S rig point in the bag, and a small slit was cut in the Mailman's trousers to reach the K&S in the puppets hip. This rig, along with the wire in the strap, should help lift the bag away from the Mailman when running. This can be seen in the picture below. The wire support will later be painted out of any frames in which it is visable.

Mailman's Hat
The Mailman's hat is not featured in the film as much as the bag because he loses it fairly early on in the animation....what can I say, he's no Indiana Jones. because of this I decided to only make the one hat for the puppet we use near the start of the film.

I started off by sculpting a rough shape into the puppet's head using Super Sculpey Ultra light. This is baked just like regular Super Sculpey, except it's very light weight. you can't get as much detail from it as regular Sculpey, and it's strangely sticky and silky at the same time. But it is good for bulking out large areas and keeping weight down. Once baked I carved and sanded the ultra light into the shape I wanted (above to the right).

Next, I covered the shape using the same blue material I used to make the Mailman's trausers. I glued the fabric in place using PVA glue at the top, used sparingly so that it doesn't soak through the fabric, and super glue around the rim. The fabric was glued carfully to create the folds and a strip of black card was added over the top to create the rim.

The cap section was also made with the black card which was then covered in a flexable, shiney, black plastic which I cut from an old office folder. The red strip was made from ribon I had left over from the Mailman's uniform.

The small badge on the hat was made in a similar way to the buttons on the Mailman's uniform. It was sculpted from Super Sculpey and painted with a brass enamel paint. I then coated it with a clear two part epoxy to give it a glossy shine. The simbol on the badge is of an envelope.

Here is the finished hat. It may not be in the film much but it was a fun prop to make.
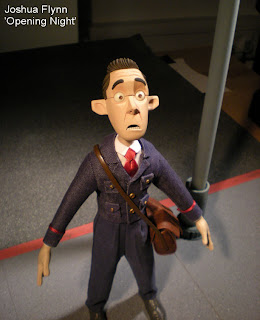
And finally here is a shot of the puppet adorning his newly aquired effects.

That's all for this time folks!
Next I'll be posting more pictures of the finished puppet's along with the theatre usher, set pictures and eventually, the filming process.
Thanks for looking.