Tuesday, 19 April 2011

Puppet Clothing- Mail Man

In this post I'm going to be talking about making the uniform for my Mail Man character. The two Mail Man puppets my brother and I will be using to film have already been bulked out and padded with foam (Which you can see HERE) so now it's time to start making some clothes.

Although this character is slender, the clothes I make will still need to be quite tight fitting. This is because I've padded the puppet in such a way that any baggy areas of clothing are actually filled with sponge. This tight fit over sponge should maintain the baggy look from my design, but also reduce the amount of 'boiling' or unwanted movement from the clothes when animating.

Templates
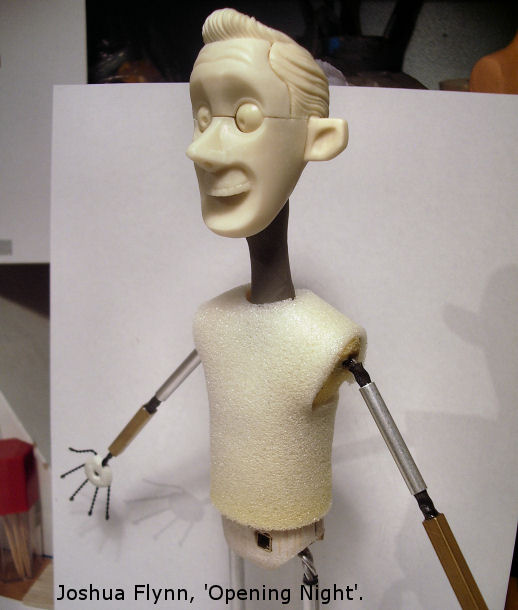
To get a tight fit on my character's clothing I decided to make paper templates of each section of the Mail Man's uniform. To help work out how different items of clothing are pieced together I would recommend searching online, many different templates for a wide range of clothing can be found for free around the Internet. Using templates for this character's clothing is especially important since I will be making this uniform twice and I want each puppet's clothes to look identical.
Using some paper and a pen, I made templates straight from my padded out puppet, curving the paper around the forms of the puppet and drawing markers for the measurements. I then cut out each shape to test if they still fitted, remembering to label everything.
To the left, on the picture above, are the original paper templates for the Mail Man's jacket. Note that the same template was used for each sleeve. To the right are a copy of the templates with approximately 10mm extra space added around the circumference for the seams. It was this set of templates that were pinned to the fabric to draw the out the shapes using chalk.

Fabric
Here is a picture of the fabrics I collected to make the Mail Man's uniform. I tried hard to find materials that replicated the look of the fabrics in my final design, and yet were still suitable for my puppet.
I had to keep in mind that although the colour and appearance of some fabrics may look right, at the 1/6th scale of the puppet, the size of the weave could look huge, destroying the illusion of this miniature world. In some cases this 'chunkification' might work, But I wanted the fabric to not cause any distraction from the look or scale of my film.
I also didn't wanted fabric that is too thick since it is harder to sew at such a small scale and can restrict the puppets movement.
I am very pleased with the fabric I've found. There are two types of blue, one for the trousers and a slightly darker one for the jacket (This helps to add variation, texture and interest to the uniform) some white cotton for the shirt and red ribbon for some trimming and his tie.

To help my puppet stand while his clothes were fitted, the armatures for his feet were returned along with some new silicone shoes. Pictured above are the shoes fresh from the mould ready to be trimmed. You can find out more about the moulding process for these shoes HERE.

Here is a shot of a test fitting for both pairs of trousers. Like any type of clothing, the patterns were sewn together using a sewing machine and then turned inside out for a clean seam. The trousers were left longer at the waist and foot to allow for adjustments. The length of the trousers were shortened once on the puppet.


To make things easier, I decided to glue the hem of the trousers using contact adhesive as opposed to stitching at such a small scale. The long fabric was trimmed and folded back inside the leg.

To the left, on the picture above, are the Mail Man's Jacket and trousers straight from the sewing machine. On the image to the right, The jacket arms have been shortened to the correct position of the characters wrist and cuffs have been added. In a similar way to the hem of the trousers, the cuffs required no extra sewing to create.

To make the cuffs I started by trimming the overly long jacket arms to about 5mm too short of where they should be at the wrists. Their edges were then glued back on themselves to stop the fabric from fraying. The idea is to add the cuff section using new strips of fabric to make up the arm length. The new cuff section should hide the original shortened arm fabric and appear to be part of the same sleeve folded back on it's self  creating a cuff.
For my cuffs I used strips of the same blue fabric used for the jacket , cut to match the measurement of the wrist. all the edges were folded back on themselves and glued with contact adhesive to stop the fabric from fraying. I also added some red trim to my cuffs by gluing thin ribbon folded along one edge (pictured above). The sewn edges of the ribbon even look as though it has been stitched to the fabric.

The final stage in creating the cuffs was to add a small loop of white cotton fabric, glued inside the jacket cuff to suggest a white shirt underneath.

In the next part I'll talk about the fabrication of the rest of the white shirt, as well as the collars, red tie and finishing touches such as the jacket pockets.

Thanks for looking.

Thursday, 14 April 2011

Puppet Head Sculpt- Mail Man Part III

It's time to continue talking about the head sculpting process. To catch up you can find part one HERE and part two HERE.
You can also see how the 'Actress' character's head sculpt is coming along on my brothers blog HERE.

So far I have sculpted and moulded the Mail Man character's head pieces and cast out a number of copies. Here is a picture of all the pieces so far including the two main head components (one for each Mail Man puppet) and a selection of replacement 'mask' parts for the brow and mouth.

At the moment all of the replaceable brow and mouth  pieces are identical and need to be individually changed to give each mask a different expression. However, before I do that, the face pieces need to be able to be easily attached and removed from the main head component. It's important that the mask pieces lock-on to the head so that they stay fixed in place and don't move or fall off the puppet while filming.

An Attractive Face
My brother and I have decided to use magnets to attach the face pieces to the head. Another option would have been to keep the faces in place using tacky wax, but we felt that magnets are cleaner and would hold the faces more securely. Not to mention...magnets are cool.

For my puppet's head I used very small Neodymium magnets. This is a very power full type of magnet that comes in a wide range of shapes and sizes. Not every piece will need a magnet, they will only be used in the puppets main head component. Each replaceable mask piece will then be given a small amount of steel to attract to the magnets. For this I decided to use small steel tacks.

Using a rotary tool I drilled two holes into the puppet's head for the magnets to be set into. One for the brow and another for the mouth pieces. The hole for the mouth pieces happened to go straight through to the hollow area where the neck piece slots into the head, However the magnet is thin enough to not effect the neck when the parts are slotted together. The magnets where then secured in place using a two part epoxy glue.
With the magnets in place the next stage was to add the steel tacks to the replaceable face pieces. I had to be sure the positioning of the tacks in the faces would line up to the magnets in the head. To do this I put a small amount of Blu Tack (you could use plasticine or anything similar) onto the magnets and drew a small dot in the center using a black pen. I then pushed each replacement part onto the head and the Blu Tack, leaving a print of the black ink dot on each piece. I could then drill a hole using the black dot as a guide, knowing the parts would line up correctly.

The steel tacks were shortened using a pair of pliers, leaving the head of the tack to attract the magnet. Pictured below are the drilled face parts ready for the head of the steel tack to be set inside using two part epoxy glue. Only a small amount of the steel tack was needed to hold the face pieces to the magnet meaning the holes didn't need to be too deep, avoiding the risk of drilling straight through the mask piece.
Below is a picture of the two Mail Man heads with magnets installed and an example of the now magnetic faces. The positioning of the magnets on each head are identical meaning the face pieces will attract to each head just as well as the other. The face pieces now attach securely to the heads with a satisfying 'click'.


Adding Expression
Now that the face pieces are attaching to the head nicely, It's time to give my character a wider range of expressions. The strange grin he has at the moment is starting to creep me out.

Above is a picture of some of the materials and tools I use to sculpt with. Over the years I've collected a large number of tools to use but I seem to use these the most. The needle to the right is my favorite. It's much larger and chunky than a regular needle and has a nice rounded tip. My brother uses a playing dart without it's flight as a similar tool. I also use a flat plastic tool for roughing out shapes and a pin with a white Milliput handle for fine details.
The clay I will be using to sculpt the characters expressions is Super Sculpey Firm. It's easy to work with and can be baked in a conventional home oven. I also use Liquid Sculpey, this will help the Super Sculpey firm stick to the fast cast face pieces.

Above is a small selection of the replaceable mouths sculpted for the Mail Man. These mouths were created simply by sculpting lips over the existing mouth pieces using my character expression sheet for reference. The upper row of teeth were included as part of the cast piece because they stay locked in place as we speak. The lower row of teeth are sculpted and the jaw line added to in order to simulate a hinged jaw.

These faces are only rough out at the moment and need more work before they are cleaned up. The brows also need to be sculpted to give the character a neutral and angry expression.

At the moment he looks like he has a Homer Simpson-esque  9 o'clock shadow. This will obviously disappear once the character is painted. The next step is to make sure the faces work on camera and then make any corrections that are needed. Next time I'll be able to show the finished sculpted faces and talk about the painting/ finishing process. Until next time...

Thursday, 7 April 2011

Bulking Out a Puppet- Mail Man

I think I'll take a little break from talking about my puppet head construction and save part III for another time. Today I'll be showing the progress of adding padding to bulk out my puppet.
Unlike 'Elle' (Our actress character) who's body is mostly sculpted and cast in silicone, the Mail Man's will be padded out using sponges and foams since most of his body is covered by his uniform. Once the armature is padded out his clothing will be made to fit and sewn together using real fabrics.

There will be two Mail Man puppets used for filming so I will be working on both armatures simultaneously to make sure the two puppets are padded identically. You can find out more about the construction of these armature on my brothers blog HERE.

Now for the hard part....or parts.
Harder sections are needed on a puppet in order to properly grip the puppet. These section don't need to be squashed in any way when the puppet is moved and are usually found around the chest and hip area.
To begin I created triangular shape out of balsa wood to bulk out my characters hips. I then cut the triangle  in half and traced the metal armatures shape onto the inner sides. These shapes where then carved out using a rotary tool in order for the armature to slot inside.

Square holes where cut to allow access to the rigging points. The balsa wood was then glued onto the armature using a two part epoxy glue and sanded smooth. Balsa wood is ideal for these parts because it is strong, light wieght and easy to work with. In the past I have also used blue foam core to make these parts which is easier to cut than balsa, but can also crush slightly of squeezed too hard.

The chest secton was made using the same techniques as described above. It is important to remember that your puppet still needs to be able to come apart so don't glue the balsa to any removable arm, leg or neck parts and don't cover up any rigging points. Also, a large area needs to be left above and underneeth the arms to allow for shoulder movement.

Now for the soft parts.
Areas that need to squash or stretch with the movment of the puppet need to be made of softer materials. Below are a selection of materials I've used to pad out my puppet including a selection of sponge/ foam, sharp scissors and contact adhesive.
Below I've added thicker upholstery foam to the waist and shoulder areas. I tend to cut the foam roughly to the shape I need and then glue it to the armature using the contact adhesive. Once dry, I then trim the foam further, cuting until I'm happy with the shape.

Contact adhesive is ideal because it's fast drying and can flex with the foam once dry. Remember to let the contact ashesive dry fully on both pieces before pushing them together, and make sure everything is alligned because it sticks instantly. 

To finish off the torso I added a thin foam jacket to help smooth out the upper body shape. This jacket was made from a single piece of foam cut from a template,which stretches around the body with the seam running along the back. The same template could be used for both puppets.
I decided not to use the thinner white foam for the arms and legs in order to keep them thinnner and give their shapes more definittion. e.g  the sharp trouser seams.

The arms where made using the thicker foam. It is possible to bulk out arms by wrapping the thin white foam around the armatures again and again until you reach your desired thickness. However, for this character I wanted the arm to be cut into more of a cone shape. The set of hands pictured are from an older puppet and were useful for gauging the length of the sleeve.
I decided to make the legs out of one large piece of foam. This was to try and get the right look to the characters baggy trousers. The shape was roughed out and split along the back to allow the armature inside. It was then glued and trimmed.

Insteady of cutting out a shape to look like the characters legs, I trimmed the foam into the shape of his trousers with angular seams lines similar to my concept design. The idea is to make the fabric trousers so that they are a tight fit to the foam leg and mantain the sharp seam lines. The tight trousers should also minimise the amount of boiling on the legs. This is where things such as fabric move each time you touch a puppet inbetween frames, causing it to jiggle and 'boil' once the footage is played.

Here is a shot of one of the puppets fully padded. Both puppets are now ready to have the clothing tailored to fit. The Mail Mans neck will be moulded and cast in silicone next.

Wednesday, 30 March 2011

Puppet Head Sculpt- Mail Man Part II

Today I'm going to continue going through the Puppet head sculpting process which I started HERE.

The Mail Mans head has been roughed out using Super Sculpey firm and all the removable face sections are working correctly. The next step was to clean up the sculpt to make it more presentable and aestheticly pleasing. I sculpted the head working from a large collection of referance images and maquettes I had close at hand displayed around my desk in order to capture the right details for the character.
Below is a picture of the sculpt with more detail added to the hair.
I roughly sculpted the character's mouth in a smile in order the get the correct positioning for the teeth. The upper set of teeth need to stay in a fixed postion while animating the characters lip sync. Only the bottom row of teeth would move when talking because of the way the jaw is hinged. Once I was happy with the positioning of the upper teeth, I removed the lips and carved out an area around the mouth. I then added datail to the upper row of teeth and eye areas. The sculpt ws then ready to bake to harden it.
Above is a picture of the final head sculpt. Areas of the face have been sanded to give the seams of the replacement parts a flush finish and to smooth the sculpt. I know the character has a goofy grin now, but later on I will be able to add lips and the lower set of teeth to resin cast copies of the mouth pieces in order to give the character different expressions and mouth shapes. The same process will be used to change the characters brow.
The sculpt is now ready to be moulded in silicone.
The first step was to plan how each peace of the sculpt will be moulded. Small cones of Sculpey were glue gunned onto each part to create pour spouts. These spouts are where the resin will later be poured when casting.
Next, The mould boxes were made using panels of foam board, glue gunned together.
For the moulds I used RTV silicone. Before pouring, I painted a layer of the silicone onto each part of the sculpt with a brush to make sure all the datails are captured and to reduce the amount of air bubbles.
I then filled the moulds with silicone using the 'bombs away' method where you pour the silicone from a height creating a thin stream. The fact that the stream is so thin causes any bubbles in the silicone to pop, reducing the amount of air bubbles in your mould. Air bubbles can be created when mixing the catalyst into the silicone rubber and can cause details to be lost. The best way to avaoid air bubbles is to put the silicone into a vacume chamber to de-gas. When pouring the silicone it is also important to pour the silicone into the corner of the mould box, not over the sculpt, and to let the silicone slowly flow up and around the sculpt.

Above is a picture of the three silicone moulds cured and out of the mould boxes. The sculpt has been cut out of the silicone using a scalple blade. I have cut around half of the mould in a zig zag pattern so that they snap shut and lock back together in the correct position. I chose this meathod of moulding opposed to a two part mould because it's quicker and creates less of a seam line.

The next stage is to start casting out copies of the head in resin.
I used Fast Cast resin because it cures quickly and is not too expensive. The resin is mixed in two equal parts. Below is a picture of my first casting. The pieces came out quite niclely. It actually looks like white chocolate!
As you have probably noticed, it looks like my character has been in a fight with those missing teeth. An air bubble must have been caught in the mould when casting. This problem was easily fixed by angling the mould differently while I poured the resin. The next set came out fine. And the next set, and the next set...

This is how many sets of faces I've cast so far. There will be two Mail Man puppets made for the film so only two Hair/ear parts where needed. The pour spouts were cut off using a rotary tool and the seam line were cleaned up. The moulds were cut in a way so that the seam lines are on the back of the masks and won't be seen.
The next stage will be to sculpt the different brow and mouth expressions for the replacement parts and to paint each head. But I think this post has gone on long enough so that'll have to wait until part III.
Until next time...

Friday, 25 March 2011

Puppet Head sculpt- Mail Man

Recently, I have been working on the Mail Man's head. My brother Nathan and I have decided to make two full puppets for the Mail Man character so that we can both work on animating the character at the same time on two different sets. Both the puppets need to be exactly the same so I will me molding the character's head sculpt so that I can cast two sets of heads along with all the replaceable face pieces. Overall the head will consist of four parts, the hair/ears, the eyeball socket, the replaceable mouth and a replaceable forehead.
The head needs to be made from the inside out so to begin I had to make the eyeball socket. I wanted the socket to be made of silicone so that it grips the eyeballs firmly but also allows them to turn.
The aim was to create a silicone version of the grey plastiline shape shown above. The square brass tubing (K&S) will be where the socket locks in place, and the eyes are rough fast cast copies of the beads used in my Mail Man maquette.

This was then molded using plaster using a plastic cup. once the plaster had hardened the grey plastiline was removed along with the square brass tubing. The fast cast eyes stay in the plaster to create the eye socket shape.
After casting out an eye socket in silicone I realised that it's shape was too flat and wide to fit inside the characters head. I repeated the same process with a new plastiline socket shape that saved space and curved to the contours of the face. Below is a picture of this new socket along with a silicone cast version with the eyes in place.
The square brass tubing used to lock the socket in place is also used to slot the head onto the puppets neck armature. The character's neck will be cast in silicone and needed to slot into a hollow area in the head. To achieve this I roughed out the characters neck shape creating a solid tube shape where the neck will slot into the head. I then pushed Milliput (two part epoxy hardening clay) over this tube shape and the square brass tubing and left it to harden. I then removed the plastiline neck leaving a solid, hollow Milliput shape that the neck can slot into using the square brass tubing.
Above is a shot of of the silicone eye socket and Milliput head core next to my Plasticine maquette. It is important the the proportions of the inner head core match those of the original maquette, especially around the eyes and neck areas.  
The next step was to start bulking out the head shape that supports the silicone eye socket. It's a socket for a socket!
 This was sculpted using Super Sculpey firm. At this stage I baked the sculpt to harden it. I then applied a small amount of vasiline over the front surface of the face and pushed a thin layer a Milliput onto the face and around the eyes. The vasiline stops the Milliput from sticking to the sculpt so that it can be removed once hardend creating a mask. This mask was divided across the eyes creating a forehead and mouth section.
Now the four head sections have been created, but as you can see from the picture above, they need alot of work. The rest of the facial features now need to be added using super sculpey to rough out the basic shapes.
Above is a picture of the mail mans head with most of the features roughed out. The sculpt still needs a lot of work and details need to be added but all four major head components have been made. I think thats about enough for this post, but I'll continue the head sculpting process in part two.  
Tune in next time for another exciting edition! 

Tuesday, 22 March 2011

Sculpting Puppet Feet

Now that pre-production is complete it time to move on to production and start building the characters.
We've decided to make the puppets first since they require the most work and detail. Sets and props will be tackled later.
First up on my long list of model making is to sculpt the Mail Man's feet. I'll be sculpting the feet over the puppets metal foot armature so that once the final foot is cast in rubber I'll know that the armature will fit inside. You can see how these feet armatures were made on Nathan's blog by clicking Here.

To sculpt the shoe I'll be using plastiline so that once finished, hard resin molds can be taken from the sculpt. Once molded, the plastiline is then removed from the metal feet armatures so they can be used again when casting the puppets final silicone feet. In the picture below the basic forms of the feet are being roughed out in grey plastiline.
The grey plastiline is good for sculpting with because it can become soft when warmed by kneading with the fingers but also holds details well once it cools and hardens. Below are a few images of the final feet sculpts.
Although the Mail Mans baggy trousers cover a lot of his shoes I decided to sculpt socks just in case his heels are exposed during one of his running scenes. Holes were also included so that real shoe laces can be punched into the silicone later on. The feet are now ready to be molded.